-
- iTransfer Platinum Mac

- iPhone Transfer Platinum Mac
- iPad Mate Platinum Mac

- PodWorks Platinum Mac
- iPhone Ringtone Maker Mac
- iPhone Transfer Plus Mac

- iPad Mate for Mac
- PodWorks for Mac
- iPhone Contacts Transfer Mac
- DVD to Video for Mac

- DVD to MP4 Converter for Mac
- DVD to iPhone Converter for Mac
- Blu-ray to Video Converter for Mac

- DVD to iPad Converter for Mac
- DVD to Audio Converter for Mac
- DVD Creator for Mac
- Video Converter for Mac

- MP4 Converter for Mac
- 3D Movie Converter Mac
- Video Editor 2 for Mac
- Audio Converter Pro Mac
- YouTube Video Converter for Mac

- Download YouTube Video for Mac

- YouTube HD Video Downloader Mac
- YouTube to iTunes Converter Mac

- YouTube to iPhone Converter Mac
- HEVC/H.265 Converter for Mac
- iTransfer Platinum Mac
- More
How to burn video to DVD? 
Do you have the same problem on how to burn DVD from video files? You may have videos recoreded by digital camcorders, stored on computer hard dirve, downloaded from video downloading sites, or transfered from your friends and family? Now, you can store them on DVD discs. This article shows you an easy way to burn video to DVD disc with a DVD Creator software. Follow our guide and try now!
Guide: How to burn video to DVD
Tools Required:
- DVD Creator
- DVD Creator for Mac
- Blank DVD Disc - DVD-R, DVD+R, DVD-RW, DVD+RW, DVD+R DL, DVD-R DL
ImTOO DVD Creator is a smart DVD burner software for video lovers to convert and burn almost all popular video format files to DVD.
Key Features:
- Video Formats Supported: 3GP, 3G2, ASF, AVI, DAT, DV, VOB, FLV, MP4, MKV, DVS(R)-MS, MPG, MPEG, TS, MOV, RM, RMVB, WMV, NSV, M2TS, MTS
- DVD authoring & customization: create DVD menus, clip video segments, add soundtrack/subtitles, edit effects plus more
- DVD Disc Tpyes Supported: DVD-R, DVD+R, DVD-RW, DVD+RW, DVD+R DL, DVD-R DL
 Free Download ImTOO DVD Creator from here!
Now, let's start our buring process.
First, please download and install the DVD Creator software. Launch it.

Step 1: Load video files.
Click "Add Video File(s)..." or "Add Video Folder..." button on the toolbar or main menu to load the video files you want to burn.
Step 2: Adjust output settings.
Destination: Insert a recordable disc, and choose the disc you insert from the "Destination" drop-down. Or choose "Save as DVD Folder" or "Save as Image (.iso)" option to back up your video files onto your hard disk as DVD folder or ISO image and burn them to DVD in the future.
DVD Name: Enter a name in the textbox as the DVD name.
Writing Speed: According to your CPU configuration, choose an appropriate speed from the drop-down list.
Copies: Click the up and down arrows to set the number of copies you want to burn. If you set it to more than 1, the program will prompt you to insert a new recordable disc after burning a copy.
Step 3: Create DVD menu.
Click "Templates" button on the menu panel, "Menu Templates" window pops up. Choose your favorite template from this window to create a menu instantly.
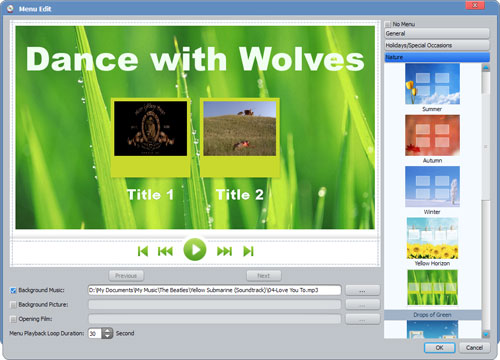
For further menu editing, please click "Edit" button on the menu panel to open "Menu Edit" window, in which you can change the template, add background music/picture, title and opening film to your menu.

Step 4: Burn video to DVD.
Click "Burn" button to start burning your video files to DVD.
OK. Done.


