-
- iTransfer Platinum Mac

- iPhone Transfer Platinum Mac
- iPad Mate Platinum Mac

- PodWorks Platinum Mac
- iPhone Ringtone Maker Mac
- iPhone Transfer Plus Mac

- iPad Mate for Mac
- PodWorks for Mac
- iPhone Contacts Transfer Mac
- DVD to Video for Mac

- DVD to MP4 Converter for Mac
- DVD to iPhone Converter for Mac
- Blu-ray to Video Converter for Mac

- DVD to iPad Converter for Mac
- DVD to Audio Converter for Mac
- DVD Creator for Mac
- Video Converter for Mac

- MP4 Converter for Mac
- 3D Movie Converter Mac
- Video Editor 2 for Mac
- Audio Converter Pro Mac
- YouTube Video Converter for Mac

- Download YouTube Video for Mac

- YouTube HD Video Downloader Mac
- YouTube to iTunes Converter Mac

- YouTube to iPhone Converter Mac
- HEVC/H.265 Converter for Mac
- iTransfer Platinum Mac
- More
ImTOO Video Converter Mac Guide: How to convert video files on Mac
For Mac users, ImTOO Video Converter for Mac is specialized in video conversion. It supports most mainstream input formats and over fifty output ones, such as AVI, MPEG, WMV, MP4, RM, etc. All these have been classified by various multimedia devices such as PSP, PS3, iPhone, iPod, Apple TV, Zune, BlackBerry, etc.
Here, the step-by-step guide below shows a way on how to convert your video from one format to another on Mac.
Step by Step Guide
Step 1: Start ImTOO Video Converter for Mac and load Files
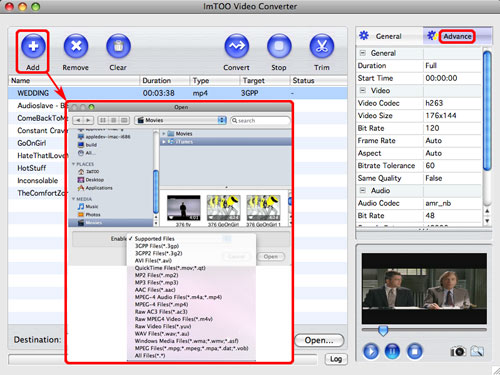
Click "Add" button in the left top of main menu and open pop-up window. Browse and select the folder to find video or audio files you wish to convert.

Step 2: Output Settings
Select one file and it's highlighted. In the "General setting", choose one format you want the file to be converted to in the "Profile" combo box. Video and audio quality can be adjusted, and you can also modify the output file.
"Advanced" contains more specific settings like video codec, frame rate, channels, etc. Change them as you need.
On the right-hand corner, you can preview the video file. Take a snapshot by clicking the camera-like button when playing.

Step 3: Trim Your Video (optional)
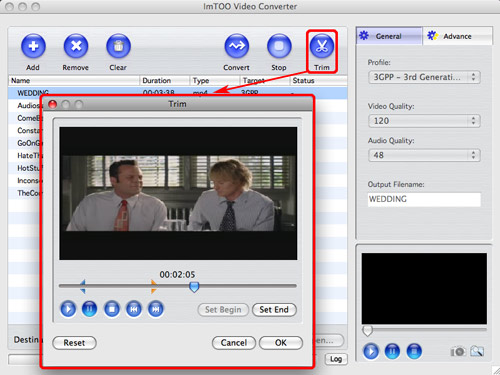
If you feel the video have some parts you dislike when previewing, click "Trim" button to set "Begin" and "End" point for the segment you want to retain when playing the video. After clicking "OK", the item you made changes will display a blue scissors on the left of the file name.
Well now you have made all your settings, we are ready to begin.

Step 4: Conversion
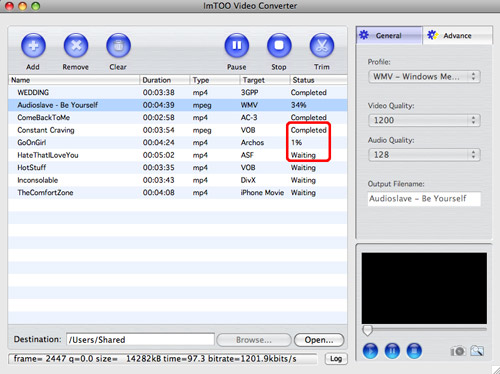
It will display "Completed" by the end of conversion in the "Status" row. Click "Open" to see the file you've converted.

Step 5: After Minutes of Waiting
It will display "Completed" by the end of conversion in the "Status" row. Click "Open" to see the file you've converted.
Other Functions
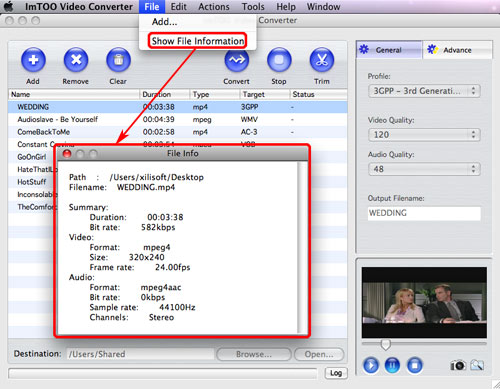
- Under Show File Information in the "File", you will see details about the file you choose like duration, format, frame rate, channels, etc.
- Click "Remove" to delete the file you select in the main panel or click "Clear" to delete all the items.

If you have any questions regarding the process or anything else, don't hesitate to send email to us.
Sales Team: sales@imtoo.com Support Team: support@imtoo.com


