-
- iTransfer Platinum Mac

- iPhone Transfer Platinum Mac
- iPad Mate Platinum Mac

- PodWorks Platinum Mac
- iPhone Ringtone Maker Mac
- iPhone Transfer Plus Mac

- iPad Mate for Mac
- PodWorks for Mac
- iPhone Contacts Transfer Mac
- DVD to Video for Mac

- DVD to MP4 Converter for Mac
- DVD to iPhone Converter for Mac
- Blu-ray to Video Converter for Mac

- DVD to iPad Converter for Mac
- DVD to Audio Converter for Mac
- DVD Creator for Mac
- Video Converter for Mac

- MP4 Converter for Mac
- 3D Movie Converter Mac
- Video Editor 2 for Mac
- Audio Converter Pro Mac
- YouTube Video Converter for Mac

- Download YouTube Video for Mac

- YouTube HD Video Downloader Mac
- YouTube to iTunes Converter Mac

- YouTube to iPhone Converter Mac
- HEVC/H.265 Converter for Mac
- iTransfer Platinum Mac
- More
How to convert video to DivX with ImTOO DivX Converter
Introduction
Step 1: Download and install ImTOO DivX Converter.
Step 2: Load video files.
Step 3: Choose output format and folder.
Step 4: Start conversion.
Other functions you may need
Introduction
If this is your first time using ImTOO DivX Converter, get ready for the easiest way to convert various popular videos into the high-quality, highly compressed DivX format. ImTOO DivX Converter helps you produce DivX videos for playback on computer or any DivX supported devices. The following is the step by step guide on how to convert a video to DivX.
Step 1: Download and install
Download the software. When you finished the download process, please run and install it.ImTOO DivX Converter
Step 2: Load video files
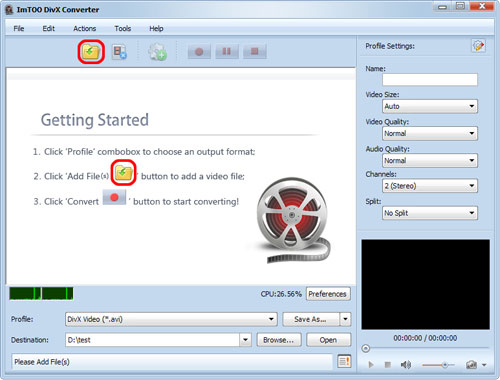
Click "Add File(s)" button on the toolbar or "File > Add File(s)" to load the files you want to convert. Or click "Add File(s)" in the "Getting Started" on the main interface to load files.
Step 3: Choose output format and folder
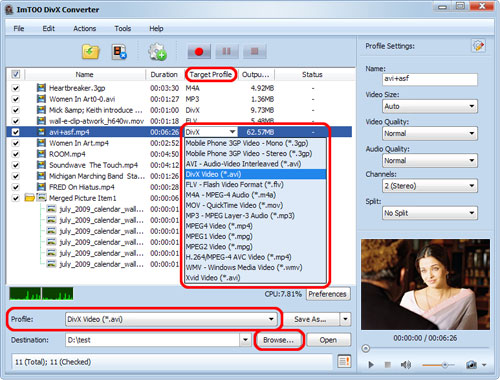
Highlight the file, click to open "Profile" drop-down list in the "Target Profile" column or choose the output format at the bottom of the main interface.
Click "Browse" button to choose the destination folder for saving the output files.
Click "Convert" button on the toolbar to start conversion. You can pause, resume or stop the conversion at any time, and get the exact progress from the progress bar at the bottom.
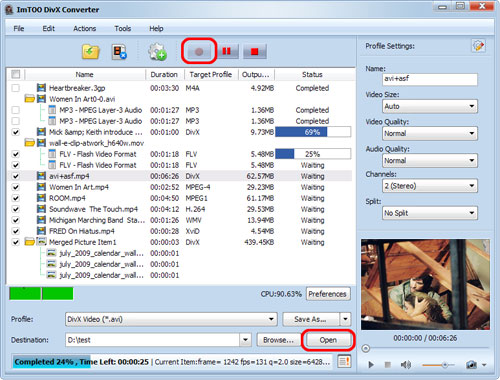
After conversion, you can hit "Open" button to find the output files directly.
1. Customize output file size with Bitrate Calculator
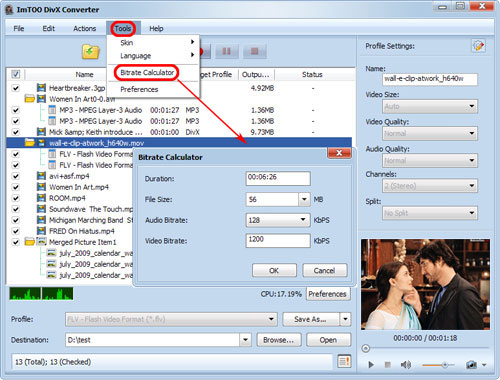
Highlight the video file and click "Tools > Bitrate Calculator", and input the file size you want, then the video bit rate will be calculated. Click "OK" button, the size you enter will be displayed in the "Output Size" column.
2. Set the output parameters
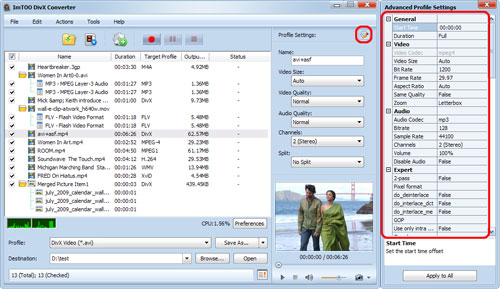
Click "Show Advanced Profile Settings" button to expand the "Advanced Profile Settings" page, in which you can set the following parameters: Name, Video Size, Video Quality, Audio Quality, Channels.
3. Add multiple profiles for the same video file
Highlight the video and click "Add Profile" button to set multiple output formats for one file, and you can get several video formats for your different players.

4. Preview and snapshot
Click the button "Play", you will preview the whole movie. Click "Snapshot" button below the preview windows to take a snapshot during preview to save as JP, PNG, GIF or BMP file.


